
ABOUT THIS TRAINING
In this training, we include a video tutorial from Extinction Rebellion Youth Los Angeles and a field guide originally published by the Rebel Alliance at CrimethInc and modified for NooWorld.
This training is a 5 Minute read.
Note: In many countries, flyposting is not strictly legal. This training does not give legal advice. Please check the laws in your area.
A FIELD GUIDE TO FLYPOSTING
Like graffiti, flyposting is a direct action technique for communicating with your neighbours and redecorating your environment. Because it’s easy to mass-produce posters, wheat pasting enables you to deploy a nuanced, complex message at a large number of locations with minimal effort and risk. Repetition makes your message familiar to everyone and increases the chances that others will think it over.
WHEATPASTE RECIPE
To make wheatpaste, mix two parts white or whole-grain wheat flour with three parts water, stir out any lumps, and heat the mixture to a boil. When it thickens, add more water. Continue cooking it on low heat for at least half an hour, stirring constantly so as not to burn it. You can add a little sugar or cornstarch for extra stickiness. Wheatpaste will last for a while if kept in sealed containers, though eventually it will dry up or become rotten, and sealed containers of it have been known to burst. Keep them in a refrigerator if you can!
POSTERS
If you’re flyposting to express information or ideas, good design is key to getting your message across. Remember, most people will see these from a distance, so make the headline huge and legible and use images that are simple, high-contrast, and equally large. Be sure the headline communicates the basic idea on its own. You can also include a paragraph or so in smaller print for the casually interested, and it’s a good idea to add a webpage address or similar link for those who want to pursue things further.
Don’t limit yourself to pasting up standard-size photocopies; many photocopying franchises offer much bigger options. You can make huge posters to put up; if such printing technology is unavailable, you can paste up big images comprised of smaller copies. The thinner the paper, the better. Thin paper takes paste better and will be more likely to rip off in tiny pieces rather than all at once if someone tries to remove it. Another way to make the poster hard to remove is to run a razor quickly down and across each poster several times immediately after you’ve pasted it up; a pasted poster sliced in this manner will only come down one small piece at a time.
TECHNIQUE
If you’re pasting up a lot of small posters, carry them in a way that enables you to access them easily without it being obvious that you have them. A messenger bag will serve for this—just make sure you can reach into it and slide one out without much fumbling. If you’re posting great big posters, roll them up, top side out so you can swiftly unroll them down the wall, and rubber band them individually.
You’ll need a container from which to apply the paste. Wheatpaste tends to be thick, so a vessel with a wide mouth such as a large plastic bottled water container is well-suited for it. It can help to have something to smooth the posters up on the wall, such as a window-washing squeegee, a wallpaper smoother, or big paintbrushes.
For each poster, pick a good location, and make sure it’s clean. Most smooth metal, glass, or stucco will take pasting nicely, while wood, brick, or concrete will be less accommodating. Next, apply the paste. The more wheatpaste you use, the longer it will take to dry, so use the minimum amount to make all of the poster stick. If you’re using smaller posters, spread the paste over the wall, place the poster on the pasted area, smooth out all air bubbles and wrinkles, and spread some paste over the top to hold down the corners. If you’re using larger posters, unroll them flat on the ground and apply the paste to their backs, then put them on the wall, smooth them out, and add another layer of paste. Starting out on the ground renders you less conspicuous while you’re making sure the paste is evenly applied.
When you think about where to paste, balance the length of time the poster will probably stay up against the amount of traffic the location gets. Often, it is better to put up a poster in an alley that will remain for months than it is to put up a poster on the main street where it is likely to be taken down quickly.
Because flyposting is not strictly legal in many places, it is recommended to flypost inconspicuously. Late in the evening can be a good time for flyposting, when the streets are quiet but not yet empty.
A bicycle can be a useful accessory for flyposting. You can carry supplies in a basket on the handlebars, and it can function as a ladder to reach places where your art is more visible and harder to remove. It can also assist you in making a quick getaway, should the need arise. Bring something to clean up your hands afterward.
APPLICATION
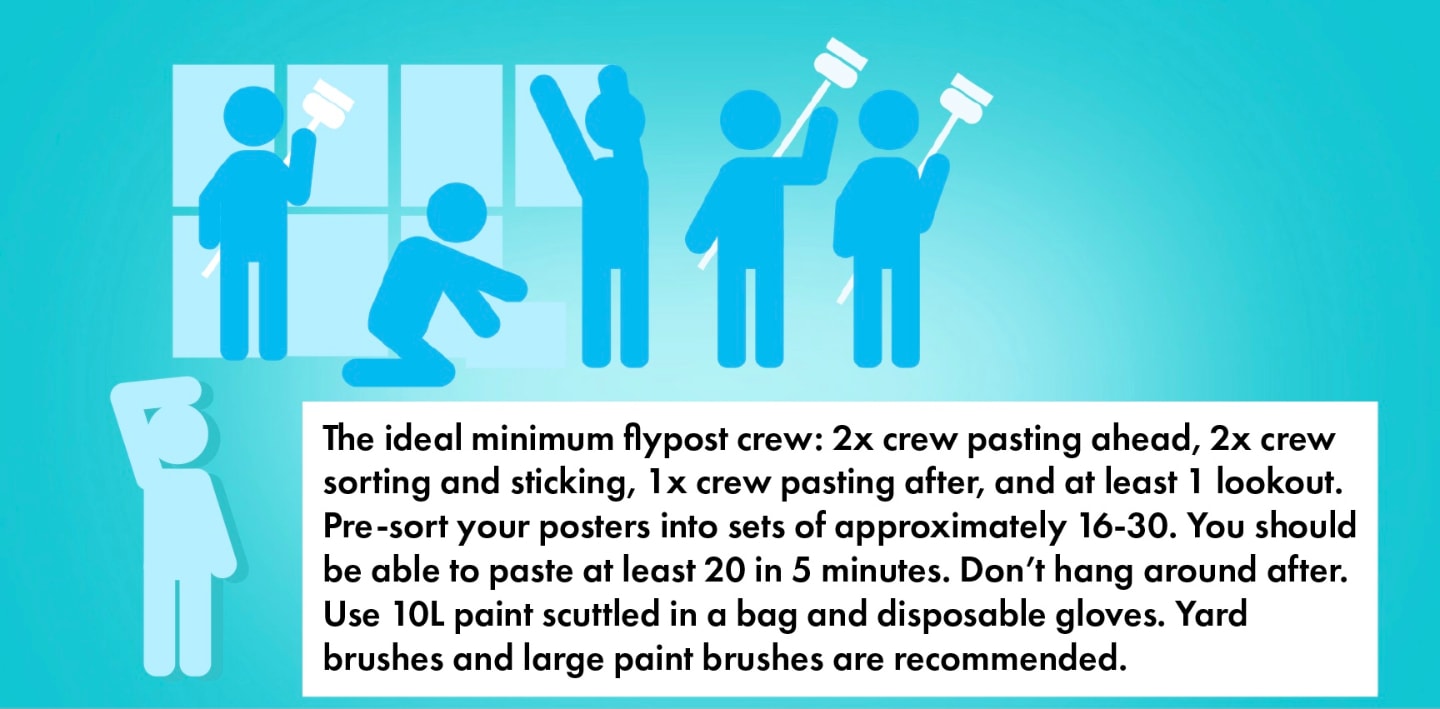
A well-coordinated group can cover a city in posters in the course of a single evening. You can divide the area, set the target locations in advance, and carry out the action quickly so you’ve all disappeared by the time people notice the new posters everywhere. Flyposting can also be applied to rework the images and messages of billboards. A group attending a mass mobilisation could make flyposting kits including ready-to-use wheat paste, posters, and maps showing vulnerable zones of the city to distribute to other groups with time and energy to apply.
To receive your badge for this training, make sure to leave a reaction above!
Do you have a training or a good idea for one? We'd love to hear from you. Please contact us at trainings@noo.world.
I’d recommend not using any wall adhesive, since it’s not as environmentally safe as wheat paste.
Does anybody know if normal paper is too thick for this?
Try to look for green printing companies in your area if you can!